Here’s the truth: lawn care business names matter.
It is pretty competitive out there and having a memorable business name can be the key to standing out from the crowd.
Your company's name is often the first impression potential clients see and it should immediately convey professionalism, quality, and the services you offer.
In this article, we’ll show you how to choose lawn care business names that:
- Are memorable and fun
- Showcase the audience you serve
- Will be unique and creative
Plus, we’ll even share 100 lawn care business name examples to get you started!
Choosing Memorable Lawn Care Business Names That Stand Out
Your lawn care business name creates the first impression for potential clients and should immediately convey professionalism, quality, and expertise. Memorable names using wordplay like "Lawn Rangers" or "Cut Above the Rest" stick in customers' minds better than generic options like "Dallas Lawn Care." The key lies in balancing fun and creativity with credibility while avoiding names that cross into cheesy territory.
Geographical references help connect with local communities and make your company more relatable and memorable. Examples include "Mile High Mowers" for Denver, "Emerald City Greeners" for Seattle, or "Lone Star Landscaping" for Texas markets. These location-based names create instant recognition and establish local presence while making your services feel familiar to area residents.
Once you select your business name, secure your brand online by registering a matching domain name through services like GoDaddy or Namecheap. Create a professional website using platforms like Wix or WordPress, then claim business listings on Google My Business, Yelp, and Angi for improved visibility. Legal considerations include choosing a business structure like LLC or corporation, registering with state agencies, and obtaining necessary licenses and permits for lawn care operations in your area.

Get 7 of our best performing flyers (tested over 8+ years), put into print-ready templates.
Get Your FREE Templates TodayLawn Care Business Name Guidelines
When choosing a name for your lawn care business, there are several factors to consider.
It should be easy to pronounce and spell and show a sense of credibility and expertise.
But most importantly, it needs to be memorable – the kind of name that sticks in people's minds long after they've heard it.
The Power of Wordplay
One of the easiest ways to create unforgettable lawn care business names is to make them fun.
It is a fine line between being cheesy and memorable, and you know what will work best in your area.
That said, fun names like the "Lawn Rangers" or "Cut Above the Rest" are easier to remember than something really generic like “Dallas Lawn Care.”
Ideally, you want to showcase your company's services and also inject a bit of humor and personality.
Geographical and Local References
Another effective strategy for creating memorable lawn care business names is to incorporate your community or area.
This not only helps to connect with the community you serve, but it can also make your company name more relatable and easier to remember.
For example, a lawn care business operating in the Dallas area could be called "Dallas Lawn Rangers" or "Lone Star Landscaping."
Other examples could include "Mile High Mowers" (Denver), "Emerald City Greeners" (Seattle), and "Valley Verde" (Phoenix).
Securing Your Brand Online
Once you've landed on the perfect name for your lawn care business, it's important to secure your brand online.
The first step is to register a domain name that matches your business name as closely as possible.
There are tons of domain registrars, such as GoDaddy, Namecheap, and Google Domains, where you can purchase your desired domain name.
Next, you'll want to create a professional website that showcases your services, provides contact information, and helps establish your brand identity.
While you can hire a web developer, there are some DIY website builders like Wix, Squarespace, and WordPress that allow you to create a good website without any coding knowledge.
Finally, be sure to claim your business listings on popular online directories like Google My Business, Yelp, and Angi.
These listings not only improve your online visibility but also provide potential clients with some insights about your lawn care services.
Legal Considerations and Next Steps
There are also some legal considerations and additional steps to take to ensure your company is properly set up and protected.
First, you'll need to decide on a business structure, such as a sole proprietorship, partnership, limited liability company (LLC), or corporation.
Each structure has its own advantages and disadvantages in terms of liability, taxes, and operational considerations.
It's best to consult with an attorney or CPA (i.e. certified public accountant) to determine the option that is right for you and your business.
You'll need to register your business name with the appropriate state or local agencies. This process varies depending on your location and business structure, but it typically means filing paperwork and paying registration fees.
Additionally, you'll need to obtain any necessary licenses and permits required to operate a lawn care business in your area which could include sales tax permits, contractor licenses, and business operating licenses.
100 Lawn Care Business Name Examples
To help inspire your own unforgettable lawn care business name, here are 100 examples for inspiration.
1. Yard Artisans
2. Grass Monkey Business
3. Cut Above the Rest
4. Sod Studs
5. Turf Terminators
6. Mow 'n' Blow
7. Dallas Lawn Rangers
8. Lone Star Landscaping
9. Queen City Cutters
10. Tri-State Turf Masters
11. Mile High Mowers
12. Emerald City Greeners
13. Valley Verde
14. Premier Lawn Care
15. Pristine Grass and Greens
16. Lush Landscapes
17. Emerald Lawn Services
18. Vibrant Yards
19. Verdant Vistas
20. Immaculate Lawns
21. Manicured Gardens
22. Sharp Shooters Lawn Care
23. The Grass Massagers
24. The Backyard Bliss Makers
25. Mow Town
26. Grass Kickers
27. The Lawn Rangers
28. Bayside Blooms & Lawns
29. Green Thumb Crew
30. Sod Squad
31. Lawn Legends
32. Yard Heroes
33. Mow Pros
34. Trim Titans
35. Grassroots Landscaping
36. Main Street Mowers
37. The Turf Tenders
38. Lawn Lords
39. Village Green
40. Clover Valley Landscapers
41. Suburban Super Sod
42. Town & Country Cutters
43. Lakeside Lawn Care
44. Curbside Curb Appeal
45. Neighborhood Mowers
46. The Blade Brigade
47. Lords of the Lawn
48. Grass Gurus
49. Lawn Crafters
50. The Grass is Always Greener with Us
51. Community Cutters
52. Residential Rakers
53. Local Lawn Experts
54. Green Machine
55. Lawn Pros
56. Sprout Squad
57. Precision Lawn Care
58. Backyard Beautifiers
59. Lawn Dynasty
60. 5-Star Striping
61. Perfect Turf
62. Green Scene Services
63. Acme Lawn Care
64. Lawn Jackets
65. Sod Stompers
66. The Wright Cut
67. Blade Slayers
68. Grassmasters
69. Level Green Lawn Care
70. The Clipping Kings
71. Trim Masters
72. Lawn Battalion
73. Patch Masters
74. GrassRoots Landscaping
75. Emerald Grass
76. Lawn Knights
77. Sod Samurai
78. Turf Troopers
79. Patch Patrol
80. Yard Sharks
81. Prime Cuts Lawn Care
82. Ground Pounders
83. Lawn Legends
84. Clover Kings
85. Green Thumbs Up
86. Ivy Leaguers
87. Turf Titans
88. Top Blades
89. Ground Control
90. Garden Guardians
91. Sod Surgeons
92. Lawn Force
93. Edgers United
94. Cutting Crew
95. Sod Slingers
96. Eco Lawn Masters
97. The Green Dream Team
98. Sod Slayers
99. Level Green Masters
100. Green Griffin Groundskeeping
Grow Your Lawn Care Business... Faster
(and with Less Stress)
Instant invoicing
Better scheduling
Manage your clients and employees all in one system


Choose from the Best Lawn Care Business Names
Having an unforgettable lawn care business name can be the difference between standing out and blending in.
By following the strategies mentioned above, you can create a name that is not only memorable but also reflective of your brand and the high-quality services you offer.
With the right name and a solid branding strategy, your lawn care business will be well-positioned to leave a lasting impression and attract new clients in your area.
So take the time to craft a name that truly represents the quality and professionalism of your company!
Related: Answering Your Top Lawn Care Questions
Originally published April 30, 2024 at 2:20PM CT. Updated on September 18 at 3PM CT.
In the lawn care business, your time is valuable—but your advertising budget might be even more so. That’s why every dollar you spend on Google Ads needs to work hard for you.
If you’ve tried running ads only to see your budget vanish with little to show for it, you’re not alone. The good news? Google Ads can be a goldmine for finding new lawn care clients... if you know how to use them strategically.
In this blog, you'll learn how to get more clients from Google Ads—without burning through your budget.
Keeping Grass Green Won’t Cut It Anymore
If you're running a lawn care business, it's time to face the truth: perfectly trimmed hedges won’t grow your revenue alone. In today’s hyper-competitive digital world, your online presence is either fueling your success—or quietly killing your potential.
That’s where lawn care PPC comes in.
We're talking about laser-targeted ads (like Google Ads) that put your business directly in front of homeowners actively hunting for lawn and landscaping services. Done right, it’s not just advertising—it’s a weapon.
But let’s be clear: throwing money at PPC without strategy, timing, or budget control is like fertilizing concrete. Wasteful. Ineffective. Pointless.
This guide pulls back the curtain on Google Ads for lawn care businesses—the most powerful PPC platform you can leverage to dominate your local market.
1. Clean Your Campaign Structure
Having a clean Google Ads account structure is not just a best practice—it’s the backbone of performance, control, and scalability. Here's why it matters:
Better Relevance = Better Quality Score
- Google rewards campaigns, ad groups, keywords, and ads that are tightly themed.
- Higher Quality Scores = lower CPCs and higher ad positions.
- Clean structure = better ad-to-keyword-to-landing-page alignment.
Easier Performance Tracking
- You can instantly see what’s working and what’s not without digging through messy data.
- Want to pause underperformers or double down on top performers? Easy peasy if your structure’s solid.
Precise Budget Control
- Clean structure—better budget allocation by funnel, product, or service line.
- No overspending on low-priority areas or underfunding high-potential ones.
Makes Optimization Easier
- Want to A/B test headlines or bidding strategies?
- Easy to do when everything is segmented by intent, theme, or funnel stage.
Example

2. Analyze Your Performance
If a classic Google Ads report is too complicated for you, just use pre-built Google Ads scripts.

Script Link
Here is how you can install the script:
- Go to your Google Ads account and click Tools - > Bulk Actions - > Scripts
- Add new script
- Paste the script into the command panel, save it, and run in
- Make sure the script status is set to “Enabled” and there is errors during the test run


3. Set Up Conversion Tracking to Measure Performance
Make sure to count every lead you’ve paid for, whether it is a form submission or a phone call.
If you don’t have conversion tracking set up, then you shouldn't be running Google Ads because you can’t measure performance.
These are a few types of conversions you’ll want to measure:
- Phone call
- Form submission
- Call extension phone call
- Clicks on the CTA call button
- Scroll %
- Avg session duration
- Landing page heat map
If you're looking for the easiest way to set up tracking, Whatconvert is the best option for you.
- Pre-built reports
- Deals source tracking
- Dynamic phone numbers
- Google ads campaign - > keyword tracking and many more
4. Split Test Your Google Ads to Find What Works Best
Split testing is essentially when you change one variable between your Google Ads to see which one performs better.
Here is an example:
Why:

Test which local market brings cheaper and more qualified leads.
Result:
Austin had 12% lower CPC and 15% higher conversion rate, likely due to less competition and higher seasonal demand.
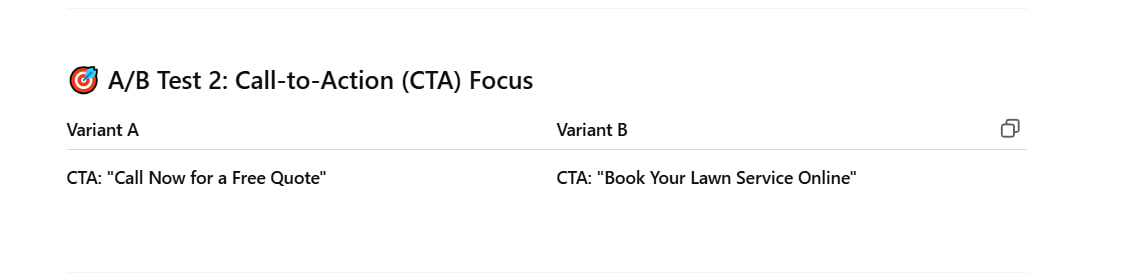
Why:
We wanted to test whether a phone-based CTA or a digital-first, convenience-oriented CTA would generate more leads for local lawn care services.
Result:
Variant B led to a 22% higher conversion rate, suggesting modern customers prefer booking online over making phone calls.
Grow Your Lawn Care Business... Faster
(and with Less Stress)
Instant invoicing
Better scheduling
Manage your clients and employees all in one system
5. Only Pay for Good Clicks Using Negative Keywords
Not many lawn care business owners do this, but if you want to save money, it’s a necessity.
This step is really simple, and the best part is that you already know what most of these are.
For instance, you don’t want your ads appearing to people searching for jobs or hiring.
Additionally, if you have a small budget, then you should probably add your competitors’ lawn care businesses as negative keywords too.
These are terms that often attract unqualified clicks in lawn care:
DIY & Education:
- “how to mow a lawn”
- “DIY lawn care”
- “free lawn service tips”
- “YouTube”
- “online course”
- “Certification”
Jobs & Careers:
- “lawn care jobs”
- “hiring”
- “lawn technician openings”
Vendors & Products:
- “lawn care equipment”
- “wholesale fertilizer”
- “used lawn mower for sale”
- “lawn care franchise”
Location-based:
If you don’t serve other cities or states, block their names. For example:
- “Dallas”
- “Houston” (Assuming you're in Tampa — block others!)
6. Exact Match Keywords First
There is nothing wrong with broad or phrase match keywords, except that it is hard to control everything at once.
Let’s imagine that your search terms list is a lawn you need to move. Instead of making chaotic moves here and there, you move the lawn from one edge to another, slowly but surely covering an entire field.
Same with the search terms and keywords.
Identify the keyword intent you want to cover, and expand your keyword list based on the results you have.

Win More Lawn Care Clients Using Google Ads
Google Ads are a great way for lawn care businesses to beat competition and win more clients.
While Google Ads might seem a bit intimidating at first, especially if you’re new to marketing, they’re a great way to start seeing immediate results.
Use this guide for creating Google Ads for lawn care businesses to become a pro at Google Ads and start growing your business fast!

Download your Google Ads for Lawn Care Businesses
CLICK HERE to see how you can use ChatGPT to create custom Google Ads for your business!
Have you heard about all the buzz surrounding AI for lawn care businesses?
AI is like having a super smart helper that can save you time, be more efficient, and even take on tasks for you.
We've put together a list of 5 awesome AI tools that are perfect for lawn care businesses like yours to help you:
- Schedule jobs and optimize routes instantly
- Offer client support 24/7
- Find new clients and generate leads
- Get answers to tricky lawn care questions
- And so much more!

Get Your FREE
Guide to AI for Lawn Care Businesses!
1. Scheduling and Route Planning Made Easy
Imagine having a tool that can create schedules and plan routes for you. That’s exactly what Service Autopilot does!
With Service Autopilot, you don't have to waste countless hours of time figuring out the best routes or worrying about scheduling conflicts.
Our software takes care of all that for you, so you can focus on providing top-notch lawn care services to your clients.
Grow Your Lawn Care Business... Faster
(and with Less Stress)
Instant invoicing
Better scheduling
Manage your clients and employees all in one system
2. AI Communication Tools
AI Chatbots
We all know that clients can reach out at any time, day or night, and AI chatbots can help you provide excellent client service around the clock!
You can add chatbots to your website to answer common questions, schedule appointments, or even start the sales process.
Setting up a chatbot might take a bit of work upfront, but the value in catching every possible lead is worth it in the long run.
Take a look at a few of the leading AI chatbots you can add to your website:
AI Messaging Creation
Does your team spend a lot of time writing client service messages? You can actually streamline this process with generative AI services like Claude, ChatGPT, or Gemini.
The sky's the limit on the kinds of messages you can create, but let’s try a “Welcome Email” as an example.
Just visit one of the services we’ve shared above and try a prompt like this:
Generate a welcome email for a new client who has booked their first lawn care service with [Your Lawn Care Company Name]. The email should be friendly and informative, explaining what to expect during the service, and should be about 3 paragraphs long.
3. Boost Your Marketing With AI-Powered Tools
Finding new clients is super important, and this is a great use of AI for lawn care businesses.
Here are just a few of the ways you can experiment with AI:
- Targeted Ads: AI can help you find your ideal clients by providing analysis and research, and then creating ads that would appeal to them.
- Prompt: Generate a series of social media ad variations promoting your lawn care services. Each ad should target a specific audience segment (e.g., homeowners with large yards, busy professionals, eco-conscious clients, etc.) and highlight the benefits most relevant to them. Use an attention-grabbing headline and a clear call to action (e.g., "Get a Free Lawn Care Estimate").
- Personalized Content: Looking for some blogs to reach leads and keep your clients engaged? Try the prompt below.
- Prompt: Generate a blog post titled "Top 5 Lawn Care Tips for Busy Homeowners." Use relevant keywords and add in CTAs that encourage readers to sign up for lawn care services.
- AI-Generated Images for Ads: AI can create high-quality, realistic images, which means you can say goodbye to stock photos.
- Prompt: Generate a series of social media ad images featuring lush, green lawns and satisfied homeowners after using your lawn care services.
Pro Tip: Most AI services have a “free” version, but it can be wise to upgrade to the paid version. Not only will you be able to use more prompts (also called “tokens”) you’ll also unlock other features like image creation with ChatGPT.
4. Supercharge Your Sales with AI for Lawn Care Businesses
Did you know that AI can be your secret weapon for selling more lawn care services? It's true!
AI can even create scripts for your sales team to use on the phone or in person.
Because this is a little more complex than creating a blog or generating an image, these prompts will be longer than the examples we shared above.
To get the most out of AI for your lawn care business sales scripts, you'll want to include the following in your prompts:
- Basic information about your lawn care company
- The purpose of the script (e.g., following up with leads, upselling services)
- The desired style and flow of the script
- Your company's unique selling points
Here's a template you can use to generate AI-powered sales scripts for your lawn care business:
Please create a natural-sounding sales script for my team to use on calls. We are a lawn care business in [city/area name], and our experienced team will be using this script to call leads who clicked on a Facebook ad.
Base the script style on the following:
- Conversational, friendly, and connects with potential clients
- Highlight how our lawn care services solve their pain points
- Included open-ended questions to ask leads
- End the script with a close to get an estimate or book a service
You can reference the following when creating the script: Unique Selling Points (USPs): [List your company's USPs here. Examples: organic lawn treatments, certified technicians, satisfaction guarantee, etc.]
Call to Action: [Specify your desired call to action. Examples: scheduling a free lawn assessment, signing up for a seasonal maintenance plan, etc.]
Include the following sections in the script:
Introduction:
- Briefly introduce yourself and your company.
- Mention your focus on lawn care services.
- Example: "Hi [client Name], this is [Your Name] from [Your Lawn Care Company Name]. We help homeowners like yourself achieve a beautiful, healthy lawn with our professional lawn care services."
Needs Assessment:
- Ask open-ended questions to understand their lawn care challenges.
- Example:
- "Can you tell me a bit about your lawn? What are your biggest concerns or challenges?"
- "How often do you typically need lawn mowing and maintenance?"
Presenting Solutions:
- Based on their answers, highlight relevant services and explain how they address their needs.
- Emphasize USPs.
- Example:
- "Based on what you've shared, it sounds like our bi-weekly lawn maintenance plan would be a great fit. This includes mowing, edging, and organic fertilization to keep your lawn looking its best. Plus, our certified technicians always go the extra mile to ensure your satisfaction."
Overcoming Objections:
- Anticipate potential concerns (e.g. price, scheduling) and address them directly.
- Offer value propositions.
- Example:
- "I understand that investing in professional lawn care services can be a decision. However, with the time and effort you'll save, you can focus on enjoying your beautiful outdoor space. Plus, our packages are competitively priced, and we offer flexible scheduling to fit your needs."
Call to Action:
- Offer a clear next step to move towards booking.
- Example:
- "Would you like to schedule a free lawn assessment so we can create a personalized plan for your property? As a special offer for new clients, we'll even waive the assessment fee and give you 10% off your first service."
Pro Tip: If the AI-generated script doesn't quite hit the mark, don't be afraid to refine your prompt or try a different AI platform. You can also ask the AI for help directly, such as: "Can you help me write a prompt that will create a sales script my lawn care team can use for upselling additional services?
5. Instant Access to Industry Expertise
One of the best aspects of AI for lawn care businesses is the ability to quickly access a wealth of information and expert advice.
Here are a few ways your crews can leverage AI in the field:
Identifying the Right Products and Equipment
Choosing the appropriate products and equipment for different lawn types, soil conditions, and climate zones is essential for effective lawn care. AI can help by providing:
- Product Recommendations: AI-driven platforms can recommend the best fertilizers, weed killers, and other lawn care products based on specific lawn characteristics and needs.
- Equipment Guidance: AI tools can offer advice on the most suitable mowers, trimmers, and other equipment for different lawn sizes and terrains.
Prompts:
- Lawn Type Specific: "What are the best fertilizers for a St. Augustine grass lawn in a hot, humid climate?"
- Weed Control: "How can I effectively control dandelions in a lawn without harming the grass?"
- Equipment Recommendations: "What type of mower is best suited for a large, hilly property?"
Tips for Dealing with Common Issues
From pest infestations to drought stress, there are lots of challenges for lawn care companies. Use AI to help you with:
- Problem Identification: AI-powered image recognition tools can help identify lawn issues, such as disease symptoms or insect damage, by looking at photos or videos.
- Proven Solutions: AI can offer tried-and-true techniques for addressing specific lawn care problems, such as controlling grubs, eliminating moss, or repairing bare patches.
Prompts:
- Problem Identification: "What is causing the brown spots on this lawn? Here's a photo."
- Specific Issues: "How can I control armyworm infestations in a bermudagrass lawn?"
- General Lawn Care: "What are the most effective techniques for improving soil drainage in a compacted lawn?"
- Product Suggestions: "What products are recommended for controlling fungal diseases in a cool-season lawn?"
How to Ask for Help in AI
You can experiment with different ways of asking for lawn care advice using AI. Depending on the task at hand, try these options:
- Step-by-Step Instructions: AI applications can provide detailed, step-by-step guidance for various lawn care tasks, such as planting grass seeds, calibrating a sprinkler system, or sharpening mower blades.
- Video Tutorials: Many AI platforms incorporate video tutorials that visually demonstrate lawn care processes. This can be particularly helpful for training new team members or learning advanced techniques.
Prompts:
- Step-by-Step Instructions: "Provide step-by-step instructions on how to properly dethatch a lawn."
- Video Tutorial Request: "Show me a video tutorial on how to install a drip irrigation system for a landscape bed."
Pro Tip: While AI can provide valuable insights, always verify the information with reliable sources. AI is continually evolving, but it can still occasionally produce inaccurate or incomplete information. Use AI as a starting point for your lawn care business, and combine it with your own expertise and experience for the best results.

How to Hire Your Best Employees… Starting Right Now
Get Your FREE Hiring Ad TemplatesTry Out AI for Lawn Care Businesses
In conclusion, AI is transforming the landscape of the lawn care industry, offering powerful tools to streamline operations, improve client service, and drive business growth.
By leveraging AI technologies, your lawn care company can:
- Automate scheduling and route planning for optimal efficiency
- Provide round-the-clock client support with AI-powered chatbots
- Generate targeted marketing content and ads to attract more clients
- Access expert lawn care advice and solutions for your team
- Enhance sales processes with AI-generated scripts
Don't hesitate to explore these AI tools in your business!
With the right AI for lawn care businesses tools, you can change the way you do business, and grow your company!
Related: Is a Lawn Care Business Profitable?
Originally published June 11, 2024 at 1:30 PM
Google Ads for pool service businesses make it possible to quickly grow your business with a steady flow of new clients, a well-established online presence, and an expanded reach.
The best Google Ads for pool service businesses have the power to untap:
- Instant results without waiting to rank in Google
- Trackable data to discover your ROI (i.e. Return On Investment)
- Google’s preference since ad space is prioritized over organic results
- Eager leads who are actively searching for a solution to their problem
Remember, the main distinguishing feature between Google Ads and social media ads is that Google Ads touch leads who are actively searching for a solution.
Whereas, social media ads touch leads who aren’t necessarily seeking a solution. As a result, they’re generally considered more intrusive.
In other words, social media ads force your business to put in a bit of additional effort in convincing clients of two things:
- They have a problem
- Your business is the solution
Alternatively, Google Ads allow you to skip the first step in convincing clients they have a problem. Which means, all you have to do is convince them your business is the solution.
Even though social media ads hold large possibilities for results, Google Ads tend to be faster and more effective. After all, you’re reaching higher quality leads.
Although, Google Ads have a tendency of being higher cost and more difficult to navigate the additional setup and background knowledge required.
In turn, many businesses unlock the full power of Google Ads for pool service businesses.
Simplify the process of creating Google Ads for pool service businesses by taking advantage of this complete guide.
Eliminate intimidation by equipping yourself with everything you need to know in this article. Explore how to maximize spending and untap the most lucrative Google Ads features.

Get Your FREE Pool Service
Flyers and Door Hangers NOW!
1. Determine What Areas to Target
Opposite to everyday brick-and-mortar businesses where clients come to you, pool service businesses are unique in that you are coming to your clients.
Which means, it’s important to choose specific neighborhoods and set areas to target so that you can condense routes as much as possible.
Keep in mind, areas with higher population tend to get results faster. However, these highly populated areas have higher competition leading to increased CPC (i.e. Cost Per Click).
If you can, try to choose areas with the best balance between the highest population and the lowest competition.
Ideally, you’ll want to avoid targeting low populated areas due to the longer amount of time it takes to see results.
Also, low populated areas don’t allow for as much insight, which helps with ads optimization.
2. Set a Google Ads Spend Budget
It’s best to wait until you have a better grasp on Google Ads before setting your Google Ads spend.
Then, you can set your ads spend budget for new lead conversions once you’ve developed a fundamental understanding of Google Ads.
While it’s important to stay on-budget, know that you can’t run effective Google Ads for as little as $5 a day (like you can with social media ads).
After all, these higher quality leads who are actively seeking solutions to their problems come at a higher cost.
As always, it’s critical to find the perfect balance between staying within your budget and spending just enough to see a decent ROI.
On average, businesses make $2 for every $1 they spend on Google Ads.
Though, the average CPC for field service businesses widely varies based on your location, population, and more.
However, you can always check Google Ads to see how much specific target keywords cost in your area.
3. Begin a Lead Followup Process
In order to avoid losing leads, you’ll need to begin a lead followup process.
For example, if your website or landing page’s main CTA (i.e. Call-to-Action) has all leads call for a free estimate, then an assistant will need to answer the phone.
By the way, you can quickly complete estimates from anywhere (even over the phone) with Service Autopilot.
How many hours per week do you spend scheduling?
4. Gain a Basic Understanding of Google Ads
Here’s a basic overview of how Google Ads work:
Match Types
The symbols near the search terms indicate the keyword match type Google uses to determine which ads show up.
Take a look at a quick summary of each match type:
Broad Match Modified
Keyword: +pool services +dallas
Broad match modified only shows ads when “pool services” and “dallas” appear in the search term.
In other words, Google will only show ads when these keywords (or something close) appear in the search box.
Broad Match
Keyword: pool services dallas
Keywords without a symbol are known as broad match keywords. Simply put, ads will appear when anything related to pool services in Dallas is searched.
Keep in mind, you’ll only be able to create four ads with broad match.
This is because broach match types randomly show ads to anyone searching for anything even remotely related to the search term.
As a result, broad match has a tendency of diluting and taking away from the desired message. Due to this, I don’t recommend using the broad match type.
Even so, if you still decide to use broad match, remember that it might decrease your CTR’s (i.e. Click Through Rate) and overall ads performance.
Phrase Match
Keyword: “pool services”
Phrase match means Google Ads will appear whenever the phrase is searched in the listed order. Although, additional words can be included before and after the phrase.
Even though slight variations are allowed, it’s not as loose as broad match.
Exact Match
Keyword: [pool services in dallas]
An exact match type means Google Ads will only appear when the exact phrase is searched. Though, Google has recently allowed for minor exceptions to this.
For example, if you were to use the same phrase as in the above example, then your ads will still appear when “pool services dallas” or “pool services by dallas” is searched.
The Primary Goal of Google Ads
The best way to ensure you’re targeting the right audience is to choose the right keywords to reach them. Then, right ads with the target audience in mind.
In order to see the best results, it’s best to only use broad match modified, phrase match, and exact match.
5. Define Your Services and Area
Write out a list of the main services your business offers. Next, choose which ones to promote in Google. Then, list the subcategories of each service.
For example:
- Pool maintenance
- Repair
- Cleaning
- Installation
Next, write out a list of the most common services you don’t offer. We’ll use this later on to create a list of negative keywords so your ads won’t appear in the wrong searches.
For instance, if you don’t offer pool installation, then you wouldn’t want your ads appearing in that search result.
6. Pick Your Main Keywords
To start, use Google’s search engine to do keyword research. Input your services into the search bar and take a look at Google’s dropdown of suggested related keywords.
These suggested keywords can then be used to drive your research in discovering which terms are most and least effective. Alternatively, this works for negative keywords too.
Then, use Google Keyword Planner to research each keyword’s volume, competition, ads spend, and more.
Plus, this free tool will provide alternate keyword suggestions to better guide you.
However, don’t overly focus on keyword volume. After all, your ads are likely on a local level with a lower population where volume doesn’t apply as much.
The primary focus here is on keyword categories, which can help you categorize your keywords into groups for ad development.
Then, test to see if any ads outperform others. Also, don’t forget to consider search intent to make sure your keywords are only targeting those actively looking for pool maintenance.
For instance:
- Pool cleaning services
- Pool cleaning business
- Pool cleaning services near me

Get 90 Days of FREE Social Media
Post Ideas!
7. Stretch Spending Further With Your Account Setup
Properly manage and organize your account in order to optimize and improve ad performance.
Stretch spending further with your account setup by creating high level categories of your services. Next, create a Google Ads campaign for each one.
Then, split each of these high level keyword categories into different ad groups.
Alternatively, you can level up your campaigns even more by breaking these categories into match types. Later on, this will help with split testing to better track performance.
Finally, create ads for each of those specific keywords and include it in the search term.
As a result, including search terms in your Google Ads can help increase relevance and CTR’s. Therefore, this helps lower CPC.
BONUS: Split Up Campaigns By Location
Use radius targeting to split up campaigns by location.
Even though you don’t have to split up every city in this way, it does help to split campaigns by granularization. In turn, this builds data in your account.
Plus, splitting up campaigns by location helps to pinpoint where conversions are originating. Likewise, you can find out where you’re getting high clicks and low conversions.
Failing to split campaigns by location prevents you from separating these two factors.
In addition, after a while, you can turn off ads running in underperforming areas and increase bids in other outperforming ones.
In fact, you can also do this with your ads schedule. Simply break ads out into smaller increments and days to discover which times outperform others, and then make adjustments.
8. Decide Where to Send Campaign Traffic
Where are you sending your Google Ads campaign traffic? For example, will you send them to your website or landing page?
The main difference between a homepage and a landing page is the navigation bar. A homepage has a navigation bar, whereas a landing page doesn’t.
For this reason, landing pages are great because they have one CTA with no distractions.
However, if you want to save additional time and money, then sending campaign traffic to your website is a viable, lucrative option.
In fact, some businesses create a hybrid between a homepage and landing page by making a clickable navigation bar.
As a result, your homepage won’t seem overly busy to leads, but traffic can still be driven to the necessary parts of your site.
Although, you’ll want to ensure your website is functional and professional in appearance. In addition, be sure it’s mobile AND desktop friendly.
Also, verify there’s a clear CTA on your homepage. Keep in mind, your CTA doesn’t have to be complicated.
For instance, a great CTA could be as simple as, “Call XXX-XXX-XXXX now for a free estimate!”
BONUS: Conduct Competitor Research
With a little research, you can find out where the competition is sending their campaign traffic. This brief competitor analysis can help generate ad ideas for your business.
Although, as tempting as it might be, don't click on the competition’s ads since Google Ads are expensive.
To avoid charging the competition for your clicks, right-click on the link, click “copy link address,” and open it up into a new tab.
While you can hurt the competition by clicking on their ads, remember that they can do the same to your pool service business.
Even though you can blacklist IP addresses, it’s best to be courteous in not charging them for your clicks - especially considering they can return the favor in retaliation.
On another note, don’t forget to see where sites like Thumbtack and HomeAdvisor are sending their campaign traffic.
Then, use this information to generate ideas based on their successes.
9. Easily Ramp Up Your Copywriting Skills
Anticipating your audience’s needs is one of the easiest ways to ramp up your copywriting skills.
Which means, you need to know what your audience is thinking, feeling, and looking for when seeing your ads.
To start, take a look at lukewarm reviews between 2-4 stars. Generally, these reviews are the least emotional and most objective.
Keep in mind, 1 and 5-star reviews tend to be more emotional and less objective (and at times, fake).
When analyzing the reviews, read between the lines to consider their concerns.
For instance, when a client says, “I don’t like XYZ” what they’re really saying is, “I value XYZ.”
Use this information to explore new ways to set your pool service business apart from the competition.
For example, if a client says they felt unimportant when another business didn’t follow up on their estimate, then you can make clients feel valued by quickly following up after an estimate.
Plus, you can include this unique perspective in your CTA to increase clicks: “Call XXX-XXX-XXXX for fast, free estimates in less than 5 minutes!”
By the way, did you know you can create quick estimates in less than 5 minutes using Service Autopilot?

Automations is the #1 way to follow up with clients. If you’re not using it, your business might still be successful - but it won’t grow.
Start Automations Tour
In Service Autopilot, our automations send emails and texts to:
10. Only Pay for Good Clicks With Negative Keywords
While few businesses utilize negative keywords, it's an important strategy to use to ensure you’re only paying for good clicks.
Much like we briefly discussed earlier, you can use negative keywords to target leads with the right intent.
For instance, if you’re targeting leads, then you wouldn’t want your ads showing up in hiring or job related search queries.
In addition, if you have a lower ads spend budget, then you’ll want to include the competition as negative keywords too.
Although if you have a higher ads spend budget, then targeting the competition’s keywords can prove quite effective in results.
However, using the competition’s keywords is a gamble, and businesses with smaller ads spend budgets need to maximize every last cent.
11. Split Test to Improve Ads
By far, one of the best ways to improve ads is by split testing. In order to split test, create two ads with only one variable of difference between them.
For instance, you could create two identical ads with different headlines as your one variable of difference. Then, see which headline performs the best.
Remember, in order to properly perform a split test, you can only change ONE VARIABLE. This allows you to directly relate a set variable to a specific outcome.
In other words, if you change more than one variable, then you don’t know which variable caused the outcome.
12. Use Different Google Ads Formats to Get Better Bids
Did you know Google offers better bids when you use different Google Ads formats?
In turn, you can save more money, maximize spending, and Google will place the ad higher in the search results.
Also, since adding multiple ads formats makes the ad larger, you’ll likely increase your CTR.
Take a look at these Google Ads formats you should consider trying:
- Call extensions
- Enables visitors to directly call from the ad.
- Local extensions
- While it’s not necessarily important for the pool service industry, it shows your business on a map with a promoted pin and a call button.
13. Take Advantage of Conversion Tracking to Measure Performance
The concept here is simple: Whatever is being measured also needs to be managed.
Which means, you can’t measure ad performance if conversion tracking isn’t set up. Therefore, defeating the purpose and appeal of Google Ads.
Take a look at a few various types of conversion tracking to consider measuring:
- Phone call
- Form submission
- Call extension phone call
- Clicks on the CTA call button
Plus, you can even use call tracking software to record and track. Then, you can use the call replays to improve the sales process and the lead quality being funneled in from the ads.
Then, if you’re using an all-in-one pool service software solution, you can save their information for future marketing opportunities and tag them as a Google AdWords lead.
Next, calculate your Google Ads revenue by exporting Google Ads leads. Calculate your ROI by dividing the leads and clients acquired by total monthly spending.
Grow Your Pool Business... Faster (and with Less Stress)
Instant invoicing
Better scheduling
Manage your clients and employees all in one system

14. Analyze Google Ads Results
While Google Ads can generate immediate results, it’ll likely take several months before you can gather enough data for significant optimization.
Remember, since you’re likely releasing ads on a local level, there’s not as much data to gather so it takes longer to spot trends.
Consider running a Google Ads campaign of this level for 6 months to gather enough data to spot trends and calculate your CPL (i.e. Cost Per Lead).
After the ad has been running for some time, you’ll ideally see your conversion rate hold steady and your CPC (i.e. Cost Per Conversion) decrease over time.
Always remember, the longer an ad runs, the more data that’s being gathered to improve it.
Use These Top Strategies to Easily Create Google Ads for Pool Service Businesses
While creating Google Ads for pool service businesses might seem intimidating and overly complex in the beginning, these top strategies will simplify the process.
Now, you have the power to unlock true growth and:
- Beat the competition
- Quickly win new clients
- Expand your online presence
- Increase revenue with automatic lead conversions
- Become the leading pool service provider in your area
Immediately take advantage of these winning strategies, and begin creating the best Google Ads for pool service businesses today!
Related: Pool Service Marketing: 13 Effective Expert Strategies
Originally published May 5, 2022 7:00 AM
This release includes some enhancements to Automations to improve your experience and to speed up processing. We’ve also made numerous updates to correct system issues that you’ve reported, especially in Forms, Accounts, and QuickBooks Online.
What’s New at SA
Virtual In-House Training
Click here to see details and sign up for Virtual In-House Training.
Advanced In-House Training
March 29- 31, April 26-28
Basic In-House Training
April 5-7, April 12-14
Automations Enhancements
We streamlined the Automation Sequence Pipeline and Automation Sequence List to increase processing speed.
Automation Sequence Pipeline
The updated Sequence Pipeline now shows only the status and number of accounts in the sequence.

Until now, the Sequence Pipeline displayed a lot of data for each account in the sequence, such as the name of the client or lead, their address, and how long they had been in the sequence.
Reducing the data on the Sequence Pipeline screen will give you a clearer overview and speed up screen load time. You can click into any individual sequence to see detailed information.
Click the “total items” card in a sequence to view the Automation Sequence list screen, with a list of the clients in that sequence.
Automation Sequence List Screen
The Automation Sequence list screen looks like this:

These columns appear by default:
Filter the Automation Sequence List
Click Add Filter to filter by any of these columns on the Automation Sequence list screen.

For example, you might click Sequence Status to filter for all scheduled automations.
Updates to Correct System Issues
Accounts
- Accounts created through the Add Account feature from the Email and Estimate buttons in Tickets weren't being recognized in the “Client Since Date” filter. This has been fixed.
- In some cases, route sheets were not generating. This has been fixed.
- In some cases, the ACH Payment Method was not saving. This now works as expected.
- Some attachments in Chrome including docx, xls, and pptx were not opening. This has been corrected.
- In some cases, users were unable to upload .MP3 or .Mov file types. This has been fixed.
Automations
- In some cases, the Automations Processor Stop Rules would set an Automation as Completed instead of Stopped. This now works as expected.
Estimates
- We fixed an issue with the Estimates List not loading properly.
- In some cases, the Estimate Descriptions: popup windows were not closing. This now works as expected.
- In some cases, the Estimate Grid’s “Amount” column did not reflect discounts. This has been fixed.
V3 Forms
- In some cases, Members were unable to publish a V3 form. This now works as expected.
- We fixed a problem with unselected Email notifications being deleted.
- In V3 Forms, if you used "Custom Field List" to map custom fields to a pre-built list, the options in the dropdown list did not stay in order. This has been corrected.
V2 Forms
- When sending an internal email In V2 Forms, the email was being sent to only the primary email address. This has been fixed.
- With V2 Forms, the Show On Assets Form did not appear in Assets. This now works as expected.
Jobs
- The Job complete by date replacement field was previously replacing with a blank string, even on waiting list jobs. This now works correctly.
Legacy App
- Previously, form responses from the Legacy app that contained duplicates were exporting properly in SA. This now works as expected.
- In some cases, the Edit Crew screen did not recognize that employees were already clocked in. This has been fixed.
QuickBooks Online
- We fixed the Getting Started process for QBO users.
Report Center
- In some cases, the Client Services report was not loading. This has been fixed.
Tickets
- In some cases, the Account Name or Vendor Name was not appearing for clients synced from QuickBooks. This has been corrected.
This release continues our drive toward making existing processes simpler and faster. New enhancements include Search Bars on list pages, a simpler setup for Chemical Tracking, improvements to the Job Wizard, and the ability to “watch” Tickets. Enjoy!
Enhancements
Accounts
You can filter for Custom Fields on the V3 Accounts list.
- We added a new option to the Custom Fields filter, is empty, based on Member feedback.
- Note: You can search on only one custom field at a time, not combine multiple custom fields in a search.
Calendar Events
When you are creating a Calendar Event, the Body field is no longer required. This is for consistency with other screens.
Chemical Tracking Enhancements
No more restricted entry
With the growing popularity of SA’s Chemical Tracking feature, we’ve removed restrictions for using it. You are no longer required to attend the training webinar before you’re allowed access.
But do check out all the free training resources! There are videos, a user guide, and articles on Chemical Tracking in the Help Center.
- Go to Settings > Chemical Tracking to set up your company for the Chemical Tracking feature.
Consolidated Settings
We’ve consolidated Chemical Tracking Settings into one tab, at Settings > Chemical Tracking > General Chemical Settings. Here, you can add or change any of your chemical information.
Consolidated Emails
We consolidated Chemical Tracking Emails into one screen. Here, you can manage your emails for clients, with separate tabs for Client emails: Instructions, Recommendations, and Upsells.
Copy Products
You now can copy a product to save time with creating new items that are similar. This is particularly helpful for Chemical Tracking to help you replicate application rates and product mix instructions.
To create a Product copy:
1. In the Non-Inventory Products list, select a product.
2. In the Actions dropdown list, click Copy.
3. In the Copy Product dialog, fill in the New Name field to create the new product in your Products list.
4. Open the new product copy and edit it as needed.
Copy Services
You now can copy a service to save time when creating new services that are similar.
To create a Service copy:
1. In the Services list, select a service.
2. In the Actions dropdown list, click Copy.
3. In the Copy Service dialog, fill in the New Name field to create the new service in your Services list.
4. Open the new service copy and edit it as needed.
Help Center
Have you checked out the Help Center lately? We’ve added a section for Service Autopilot User Guides.
- Click Help Center under your avatar, then go to Getting Started & Training > Help > User Guides.
Job Wizard Enhancements
Appointment times
We simplified setting Appointment Times on the Job Wizard.
- You can still select from the Calendar tool, but now you have the option to type the time and AM or PM directly into the field, similar to the V3 Calendar Event Editor.
Budgeting tool
We’ve added a Budgeting tool to the Job Wizard, similar to the tool in V2. This tool lets you calculate your budgeted hours and set up budgeting overrides for repeating jobs.
1. When scheduling a job on the Job Wizard, click the cog icon to bring up the Edit Budgeted Hours dialog.
2. Enter the number of staff members and hours into the Men and Time of Job fields. The system calculates your budgeted hours appear under B.Hrs.
3. You can type your target staff hour rate into the field labeled To achieve man/hr Rate of. The dialog then shows you what to change in order to get the rate you want.
4. Click the number under B.Hrs if you want to adjust the budgeted hours.
5. Click Add Override Budgeted Hours to make changes to the budgeted hours for a specific date range. This can be useful for repeating jobs.
- Type a date into the Start Date and End Date fields, or use the calendar tool.
- Click Add override to add more time periods, if needed.
Invoices
The Activity Stream on the Invoices list lets you quickly see if a payment is owed or has been over-applied to an invoice.
- The Remaining Amount appears with a red border if a payment is owed.
List Pages Search Bar
To help you quickly search for records, we’ve added Search Bars to these V3 list pages:
Accounts, Tickets, Invoices, Payments, Credits, Expenses, Installment Plans, and Forms
- As usual, you can add more filters to narrow your search.
- Change your search filter by selecting another radio button and clicking Update filter.
- There’s still an overall search feature at the top of every screen.
Tickets Enhancements
Watch Tickets
You now can specify Tickets to watch, and you’ll receive alerts about any changes.
1. Open an individual Ticket or select multiple Tickets in the Tickets List.
2. Under Advanced Actions, select Start Watching or Stop Watching.
- When you open a watched Ticket, you’ll see this banner on the screen:
- You and others watching this Ticket will see alerts when there are changes to it.
- Anyone looking at the Ticket will see the initials of others who also are watching it on the bottom right of the screen.
- And that’s not all! The My Day page now has a ”Watching” tab for Watched Tickets. Click the tab to see a list of all your watched Tickets.
Complete a Ticket from My Day
You now can complete a Ticket from the My Day page.
1. Select the check box for a Ticket you want to complete.
2. At the prompt, click Confirm.
3. The Ticket information shows a strikethrough to indicate the Ticket is complete.
4. If you want to re-open the Ticket, select the check box again and click Reopen on the confirmation dialog.
If you don’t reopen it, the Ticket is removed from My Day after you refresh the screen.
Client Portal Enhancements
Autopay
If you offer Autopay:
- If your client has a credit card on file for autopay, the system will automatically update their payment information for any scheduled jobs, and future invoices will use that credit card as the payment method.
If you disable Autopay:
- If the client updates their credit card information, their payment information will be updated correctly with that information for future invoices.
- Note: Any job that has manually updated payment information will NOT be changed.
Create Tickets from Services
With this release, your clients can create Tickets from Services on the Client Portal.
- They can create the Ticket under My Services from either the main job or an individual visit. When the Ticket appears in SA, it will be marked as a Related Item.
- Note: This function does not reschedule a visit or service. It simply creates a Ticket related to the job or service. Maintenance-only businesses like lawn care might want to disable this feature because it probably would not apply to most of your clients.
Client Portal App Enhancement
Clients can now submit Ticket requests from Jobs and Visits on the Client Portal app.
- This gives clients a simple way to notify your company of changes, issues, or other requests.
Legacy App Enhancements
Failed Login Message
We reworded a generic error message, “invalid username,” which a user might see if they didn’t use the correct credentials to log into the Legacy app.
- The message now notifies the user that their manager must update the user license.
Attachments for Tickets
If Legacy app users send or receive emails with attachments that are too big or not a supported file type, the Ticket that’s created will not have the attachment. You’ll instead see a message stating that attachments were blocked.
- Attachments must be less than 20 MB.
- Supported file types are: doc, docx, xls, xlsx, ppt, pptx, pdf, rtf, txt, png, gif, jpg, jpeg, and bmp.
Updates to Correct System Issues
Accounts
Activity Stream
- On the Activity Stream, the Past Visits card sometimes showed the paper clip icon to indicate an attachment, even after the attachment was removed. This has been corrected.
Edit Account screen
- For non-U.S. Members using Payroc credit card processing: On the Edit Account screen, closing the Add Card dialog sometimes caused a blank error message to appear. That’s not helpful, so we fixed it.
Automations
- In a few cases, the “Invoice was Paid” stop condition would not stop a running instance triggered by an “Invoice Past Due” condition. This now works as expected.
Client Portal
Payments
- In a few cases, if a client paid an invoice on the Client Portal, it would still display in the list of invoices to pay. The list is now updating immediately.
Registration
- We addressed some issues with Client Portal registration.
Scheduling
- In some cases, if a past service was still scheduled (not completed, cancelled, or skipped), it would show the incorrect month for the schedule. This was fixed.
Tickets
- If a client submitted a Ticket from a Visit, they would see the @ symbol, even though no appointment time was set. This has been fixed.
Email Integration
Mobile Devices
- We made some usability fixes for mobile devices.
Yahoo Email Addresses
- We fixed a Reply All issue for Yahoo Email users.
V2 Forms
- For non-U.S. Members who use CardConnect or Open Edge credit card processing: Chrome users had problems submitting the CC Update Form. This has been fixed.
V3 Imports
- When on a V3 screen, navigating to Imports was going to the incorrect screen. It now takes you to the correct one.
Jobs
- For Chrome users, Avatars for resources were not displaying on the Review Job screen, but they’re back now.
Legacy app
- In a few cases, signatures on Estimates were not being saved. This now works as expected.
Service Autopilot
- In some cases, if you were setting a sales tax and an error prevented it from saving, the system would let you close the screen without telling you about the problem. This has been fixed, so you’ll now be alerted when such an error occurs.